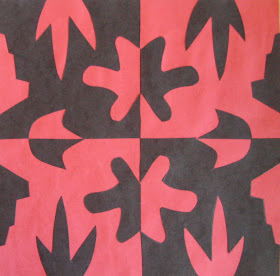
 This project is similar to the last one I posted, but this one has a mirror image that works vertically as well as horizontally. It's really not that much more difficult, especially if you've already done the first one, but it's definitely impressive! (Both are adapted from the book Wild & Wonderful Art Lessons by Gene Baer, a great resource which unfortunately is long out of print and a bit tricky to find.... but worth the effort!
  1. Start with two 9" squares of construction paper in contrasting colors. (Here I'm using black and red.) Choose one color to be the background and set it aside.
2. Fold the other square in half vertically and then in half again horizontally.
3. Draw one large shape on each side of your folded square. Each shape should be different and none of them should touch or overlap. (Have an adult check before you cut!)
 4. Cut out the shapes you drew and save all the pieces!
5. Now, open up your paper and lay it flat. Label the sections 1, 2, 3 and 4, from left to right, top to bottom.
6. Then, cut your four sections apart. Glue #1 and #4 in place (across from each other diagonally) on the contrasting paper. These sections are now finished!
7. Next, lay sections #2 and #3 in place, but do not glue them down! Place the
 cut-out shapes where they go - no glue yet!
8. Carefully, lift off the main pieces and then glue the smaller shapes in place on section #2 and #3. You're done!


This one is just as great! I'm not an art teacher but I'm very inspired by your projects you post on this blog, thanks so much for sharing. :-)
ReplyDelete