Pages

Thursday, October 29, 2009

Watercolor Fish

These are your basic crayon resist fish, but with a new twist.... students painted the fish separately from the background, then we glued them on top after everything was dry. The result is a background that looks continuous. Try sprinkling some salt on your background before it dries for an interesting, "watery" effect! I like to put up lots of visual references for students to look at for inspiration.... calendar pages work well for this. (Ask parents to donate their old calendars at the end of the year!)

1. First, paint your background on a piece of 9x12 heavy weight construction paper or watercolor paper. Use colors that you might see in the ocean.... blues, greens, turquoise, purple, etc. Use lots of water and pigment, so your colors are bright!
2. Quickly, before your paint has a chance to dry (while it still has a "sheen" to it), sprinkle some salt on your painting (we used rock salt this time and it seemed to work even better than normal salt). Set your painting aside to dry overnight.
3. Now,
use a pencil to draw a large fish in the center of another piece of the same size paper . Don't worry about drawing a fish that looks exactly like one of the examples, but just combine different bodies, fins, tails, etc. to make your drawing "fish-ish". Add some fun patterns and details.
4.
Then, trace over your pencil lines with a black crayon, pressing hard.
5. Finally, use watercolors to paint your fish. Make it bright and colorful!
6. Let both paintings dry overnight. Then, the next day you can brush the salt off of your background painting. (For the salt to take full effect,
it really is important to let your painting dry overnight, so be patient!)
7. Cut out your fish (or have an adult help you) and glue it onto the background. ("Yes! Paste" is the very best thing to use for this project, as it will dry flat and permanent and won't peel up or pop off like glue sticks will!)


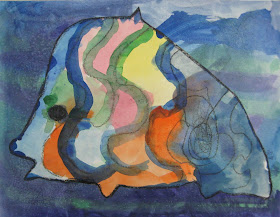

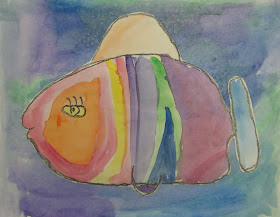

These delightful paintings were done by my some of my first graders, for our KidsKreations fundraiser project. This is a great project for re-printing onto products because of the high success rate (everyone was happy with their painting), the bright colors and the charming, child-like designs. I can't wait to see how adorable they look printed on cutting boards, note cards, coffee mugs, and more!!

Sunday, October 25, 2009

Paper Sculpture Inspired by Alexander Calder

This wonderful sculpture was created at my last Teacher Workshop.... I don't know who to give credit to, so if this is yours, please let me know!

Alexander Calder (1898-1976) was an American artist who was born into a family of artists and sculptors and became one of the 20th century’s most influential modern artists. He is also known for inventing the mobile and the "stabile", his name for a fixed sculpture with similar design elements to a mobile.

Try this form of “additive sculpture” to experiment with abstract designs! Calder often created his sculptures in solid red or black, so use paper in those colors to create your own Calder-inspired sculptures. (Younger students will enjoy using a variety of colors together to design the playground of their dreams!) Use the techniques below to create 3 dimensional sculptural effects with paper:
  • Cutting - single or multiple cuts
  • Folding - (check out what you can do simply by folding... http://www.graficaobscura.com/fold/page001.html)
  • Curling - use long, thin strips of paper to make spirals and reverse spirals
  • Rolling - make cones and tubes
  • Bending - change direction without creasing the paper
  • Scoring - lightly run scissors across the edge of a ruler to just barely break the surface of the paper for a crisp fold (a paperclip may also be used on lightweight paper), a great way to make folds along a curve
  • Layering - glue smaller pieces of paper onto increasingly larger pieces (like a mola)
  • Slicing & Joining - cut a slit into wider piece and slide narrower piece into it
  • Twisting - hold one end of the paper with your right hand and one with your left hand and twist a little or a lot
  • Crumpling - scrunch paper in both hands
  • Stuffing - crumple paper and wrap with a second layer of paper
  • Crimping - use a special “crimping tool” to make small, uniform waves or folds, similar to corrugated cardboard
For this project, I use a 10"x10" square of foam core board for the base, heavyweight construction paper, scissors, and YES! Paste. A craft stick, or popsicle stick, works great for spreading the YES! Paste. (If you use a glue stick instead, it won't hold as well before it dries, so you'll need to help it out by taping or paper clipping your glued pieces until the glue has dried completely.)

Wednesday, October 21, 2009

Hand Print Art for Pre-K and Kindergarten

I don't usually post project ideas for Pre-K, since I teach K - 6 (so most of my ideas and resources are for those grades). Special thanks to Denise Harrell, the coordinator for Young Children's World in Abilene, Texas, who submitted these ideas. She used these projects for a Kids Kreations fundraiser and wanted to share them with others who are teaching this age group, as preschool teachers (like the rest of us!) are always on the look-out for good ideas! Thanks, Denise!!


While it can be desirable to let Preschoolers just experiment with their materials and create intuitively, there are times when you need a finished product with a holiday theme or maybe for a gift or a fundraiser project. So, here are a few ideas for creating some special artwork with this age group for just such occasions!

Hand prints and foot prints from little ones always make a special keepsake. You really can't go wrong.... they are just so darn cute! As a mom of two adult kids, I can tell you they don't stay this size for long, so get those hand prints and foot prints while you can! Finger paint and tempera paint both work well for making prints and wash off easily. (Have some wipes handy for the initial cleaning before you send them to the sink!) Hands and feet can also be printed or traced and cut out for gluing onto a separate background, which you can have the child paint ahead of time for extra charm. Details can also be added with markers or cut-paper when dry, if desired. (For more ideas with cute hand print projects, check out Hand-Shaped Art by Diane Bonica.)


One last idea with the hand-print theme.... If you happen to be a quilter, or have a parent in your classroom who likes to quilt, check out these quilts we made with our Kindergarteners a while back.... We used quilt squares from Kids Kreations and the help of some dedicated parent-volunteer quilters! These quilts were sold at our fundraiser auction in the spring.

Autumn Leaves - Kindergarten Style!

Autumn Leaf by Gabriel

If you happen to have a five year old in your life
(or maybe a class full of them!), you may want to try this fun project for fall! Hillary Dixon, one of our fabulous Kindergarten teachers, shared this idea with me today... her class had just finished making these colorful leaves and they made such a striking display that I had to run and get my camera!

1. First, use a crayon sharpener to create lots of crayon shavings in fall colors, keeping each color separate from the others.
2. Next, place the crayon shavings between squares of wax paper. A good size "pinch" of 4 or 5 colors should be enough.

3. Then, have an adult iron the wax paper (on low setting) to melt the crayon shavings, and set these aside to cool.
4. Now, trace leaf shapes onto brown, orange, red or yellow construction paper. Carefully cut these out.
5. Finally, use a glue stick to glue a leaf cut-out onto each wax paper square. Trim away any extra wax paper that may be sticking out along the edges.

6. Use tape rolls to display your leaves in a window so the sun can shine through!

Wednesday, October 14, 2009

Tessellations

Tessellations are all around us! A tile floor is a good example. Encourage your students to find other tessellating patterns in the world around them. Then make your own tessellations inspired by artist M.C. Escher. (Don't be afraid to try these... they are much easier than they look!)

First, some helpful vocabulary:
M.C. Escher - a Dutch artist (1898-1972) who is best known for his mathematically inspired drawings and prints which displayed great realism, while at the same time showing impossible perspective, eye trickery and metamorphosis.
Tessellation
- a pattern made with polygons that completely fills a space with no gaps, spaces or overlaps.
Polygon - a shape with three or more sides

Directions:

1. Cut a lined index card to 3"x3".
2. Next, cut a shape from one side of your 3"x3' card, and slide it to the opposite side of the card, without flipping it over or turning it. (The lines on your index card will show you if you’ve flipped or turned it!)
3. Now, tape the shape so that it is
exactly across from the spot you cut it from. If you include a corner in your cut, it makes it easier to line the shape up on the opposite side. (For older students, you can make this project more challenging by having them repeat this step on an adjacent side of their card, as in the sample project above.)
4. Turn your newly created shape (we'll call this your "tile") in different directions and use your imagination to see if it “looks like” anything. Lightly sketch your idea onto your tile.... be creative!
5. Place your tile on the center of a 9"x12" paper and carefully trace around it. (I use 12"x18" paper when I do this with 6th graders.)
6. Now, pick up your tile and place it next to your traced design, as if it were a piece fitting into a jigsaw puzzle. There shouldn’t be any gaps or overlapping. Then, trace around your tile again.
7. Repeat this step until your whole paper is covered and there are no gaps or spaces.

8. Trace over your pencil lines with a
Sharpie and add details to each shape to help others recognize what you “saw” in it. (Remember that whatever details you add to one shape, will need to be added to EVERY shape! Keep your details simple.)
9. Finally, color your design with markers, colored pencils or crayons.

Below is an example of a more basic tessellation done with first graders, where the shape was cut from one side of the card only. We treated this as an abstract design and didn't add any details, but just colored it in an alternating pattern.


Wednesday, October 7, 2009

Color Mixing with Kindergarten

Flowers by Gabriel
I love how K's will intuitively paint a line of blue across the top of the paper for the sky, because the sky is above them! (They usually need to be taught to make the sky touch the ground. I save that lesson for later!)


I like to start off our first color mixing lesson in Kindergarten by reading the story, "Mouse Paint" by Ellen Stoll Walsh. Then, after a quick demo, the kids push up their sleeves (literally!) and dive right in!


Many Kindergarteners don't have prior experience with mixing colors, as their pre-school paints were often pre-mixed into the colors they needed. These kids love color and they are like "sponges" when it comes to
learning about the color wheel!

I have found that the easiest way for kids to learn
color mixing is to be specific about where to place their colors on the palette.

1. First draw six circles, about 1" in diameter, around a paper plate. (Special thanks to K teacher Hillary Dixon for coming up with this great idea!) Have an adult place a quarter-sized squirt of red, yellow and blue (the primary colors) in three of the circles, leaving an empty circle in between each one.

2. Then, teach this specific way to clean your brush when changing colors: Press the brush firmly on the bottom of the water container a few times, then blot it on a paper towel to get the extra water off. No swishing or tapping! (We had recently painted with watercolor, so I had to explain that we were not adding water to the paint this
time. We were only using it to clean the brush.)

3. Now, students will mix their colors! Grab a good amount from the yellow puddle and place it in the circle between the yellow and the blue. Next, add a good amount of blue to this new puddle and mix the two together til you have a puddle of green. (If you do your color "grabbing" from the edges of the puddles instead of the center, you won't need to clean your brush to pick up the next color.)

4. Clean your brush and do this same thing with the blue and the red to make a purple (or violet) puddle.

5. Now it's time to paint! Paint three circles using the primary colors (red, yellow and blue) just above the middle of your paper. These will be the centers of your flowers.


6. Then use green to paint stems, leaves and grass.

7. Next, use your secondary colors (orange, purple and green) to paint around your centers again. Use a different color to add petals. Fill your paper as much as possible!
Flowers by Jason

Saturday, October 3, 2009

Matisse-Inspired Collage

When Matisse was elderly and too weak to stand at his easel, he began making collages with cut paper, which he called “drawing with scissors”.

Henri Matisse, a French artist (1869-1953) known for his originality and strong use of color, was one of the most important artists of the 20th century and a leader in the modern art movement. An art critic once labeled Matisse and his peers “Fauves” (French for “wild beasts”) after viewing an exhibit of their work - the name "stuck" and this became the movement known as "Fauvism". Shown here is Matisse's collage, "The Sorrow of the King".

Here's some important vocabulary:
Geometric shapes
- shapes that are commonly found in geometry, such as squares, triangles and rectangles

Organic shapes - shapes that are commonly found in nature, usually with curved, irregular lines
Positive shape - the shape itself
Negative shape - the area around a shape or in between shapes, where you can see the background behind a shape
Repeating shapes - the same shape, repeated multiple times, often in a grouping or making a path across the paper
Stylized - an image which is simplified to the point of being abstract, but still carries a resemblance of it’s original form

Directions:
1. No pencils allowed! “Draw” with your scissors only!!
2. Cut paper shapes in a variety of colors and sizes and arrange in a pleasing design on white or black background paper. Include geometric, organic, positive, and negative shapes and at least one repeating shape. (I put a list of these shapes on the board so students can tell if they've got them all!) Have some shapes overlap each other. Your collage can represent something or just be a totally abstract design. (If you choose to use representational shapes in your design, make them stylized rather than realistic.)
3. Glue your design to the background paper, the largest shapes first, then the smaller ones on top.

Helpful tips: Whenever gluing, always apply the glue to the smaller piece of paper and then stick it onto the larger paper. I recommend using "YES! Paste" and a 1" foam brush instead of a glue stick. Check out my "YES! Paste" review here.


Friday, October 2, 2009

Toothpick Sculptures - 3D Pyramid Stars

Kids love any opportunity to work in 3D and are surprised to discover all they can make using just toothpicks and some modeling material. After practicing a few basic forms, let their imaginations run wild and see all the creative ideas they can come up with!

First, let's begin with some basic vocabulary....
Tetrahedron - a pyramid with four faces that are all triangles
Square-based pyramid
- a pyramid with four triangular faces and one square face (The pyramids in Eqypt are square-based pyramids.)

Cube - a three dimensional shape with 6 equal square faces

These sculptures require just the simplest of materials! All you need is some toothpicks (the star requires 36), and something to connect them with. I like to use a modeling material called “Model Magic”. (You will need about 1 oz. per student to make the forms shown here.) You may also use raisins, jelly beans, mini marshmallows, or gum drops candies, if you prefer.

These 3D forms are fun and easy to make.... here's all you do:
1. Form equal size balls of Model Magic, about the size of large peas.
2. Stick toothpicks into your Model Magic to form the basic shapes of a tetrahedron, a square-based pyramid, and a cube.

3. Now, make another cube. Use four more toothpicks on each face of your cube to form new square-based pyramids. When you’ve done this on each face you will have made a 3D star!


Toothpick sculptures are great for group projects! Give students a challenge or a problem to solve (like designing a car of the future) and watch them get creative! Group members can work together to create their sculpture, write a paragraph about it, plan an advertising campaign and present a "TV commercial" or "news broadcast" to the class. The sky's the limit!