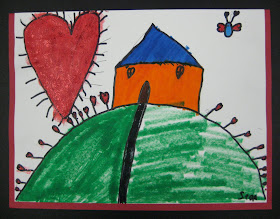
 This lesson is adapted from Karen Card, my children's middle school Art teacher. You can do this versatile project with any grade level, scaling it up or down as needed. It's fun to give kids a little structure and a lot of freedom to be creative.... then watch as all the great ideas start flowing out!
1. Talk about how the elements in a design can be obvious or more subtle. Explain that we're going for in this project is "subtle"!
2. Brainstorm the many things you could draw using a heart hidden somewhere within them, drawing examples on the board as you go. Some possibilities include: flowers with heart-shaped petals and leaves, a butterfly with heart-shaped antennae or wings, a puppy with a heart-shaped nose and ears, heart-shaped clouds or a heart-shaped sun setting behind a hill, a tree with heart-shaped leaves, a fish with heart-shaped lips blowing heart-shaped bubbles.... you get the idea!
3. Draw a scene using as many "hidden hearts" as you can. You may draw with pencil and trace your lines with a black Sharpie or just go for it and draw directly with Sharpie.
4. Then color with markers.
5. Finally, use red "glitter glue" to paint over only the hearts in your picture. So charming!!
These "hide-a-heart" cards were made by my very imaginative 1st graders! We lined our cards with red paper (just a little larger than the white paper) to create a contrasting border around the art.


I love the drawings! It's a great idea! I'll try it at school tomorrow!
ReplyDeleteI agree, I love this idea! It is always interesting to see the results after teaching the students the art of subtlety :)
ReplyDelete